Making Cutting Tools in the Home Shop
This article deals with counter bores, but the basics are the same for a number of tools.
Like most lathe or milling machine cutting tools, counter bores are commonly available
from tooling suppliers. Some are kind of expensive, some you just don't know you need
until you're in the middle of a job or hobby project. They're not that hard to make if you
have some drill rod handy, (that's silver steel, for some of you folks across the water).
The first step is to cut the basic shape of your tool using the lathe.
How long to make your counter bore depends on your use, and the size of your average
work setups. You want it as short as practical, but long enough that your mill spindle
will not interfere with the piece you are working on. For a small machine like the Taig mill
that I use, about four inches is good.
For this cutter, I used oil hardening drill rod, often called O-1. You could also use water
hardening drill rod. O-1 seems to hold an edge better. Might just be my imagination, but
that's my thought on it.
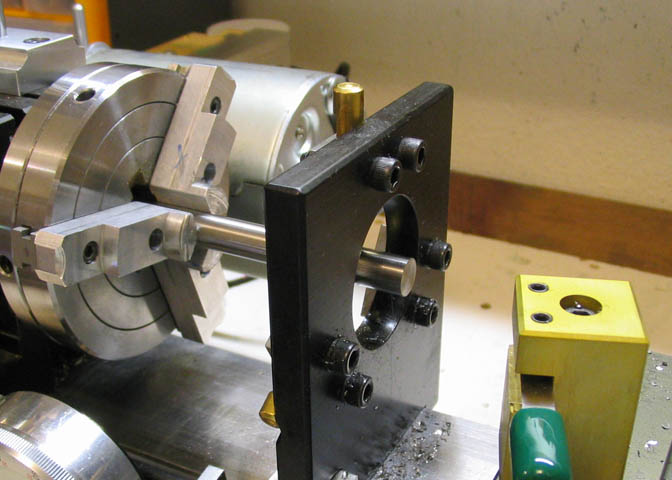
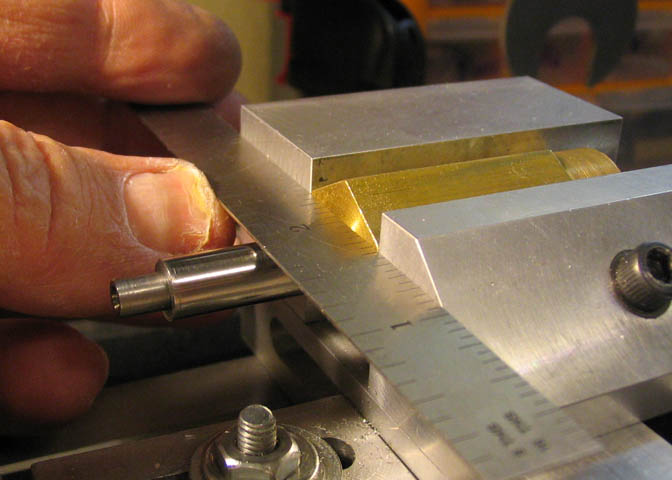
Put your drill rod in the lathe and face off both ends. This piece is 3/8" diameter, and
won't quite go through the Taig lathe head stock spindle, so a steady rest is used here to
keep it... steady.
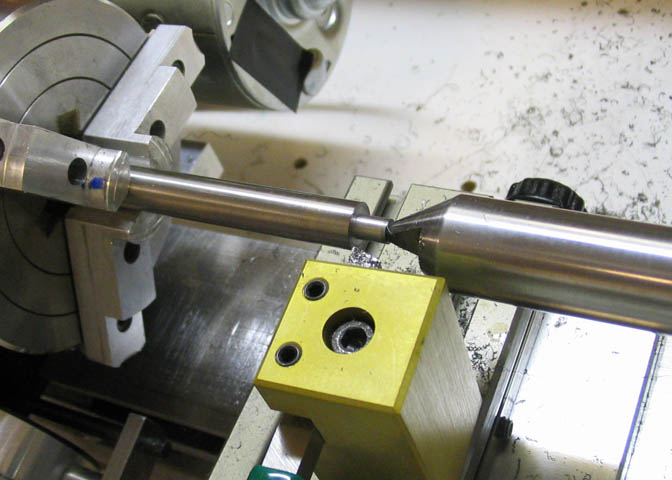
Once the ends are faced off, the pilot can be cut. Both the pilot, shown here, and the major
diameter of the flutes are cut using a dead center in the tail stock. This is especially necessary
when using smaller diameters of drill rod. The piece must also run true in the chuck. You
can use shims to true it, or do as I did and true the jaws of the chuck if you are using replaceable
jaws. Whatever the case, the three diameters that will form this cutter must be concentric as
much as can possible be.
This tool will be for counter sinking #10 socket head cap screws. The pilot needs to be a close
fit to a normal sized through hole for that sized screw. I usually drill a #11 hole (.191") if I
need a #10 screw to go through it. So, the pilot has to be close to that .191". For this cutter
I made the pilot .190". That'll fit nicely in the through hole without galling when the cutter turns.
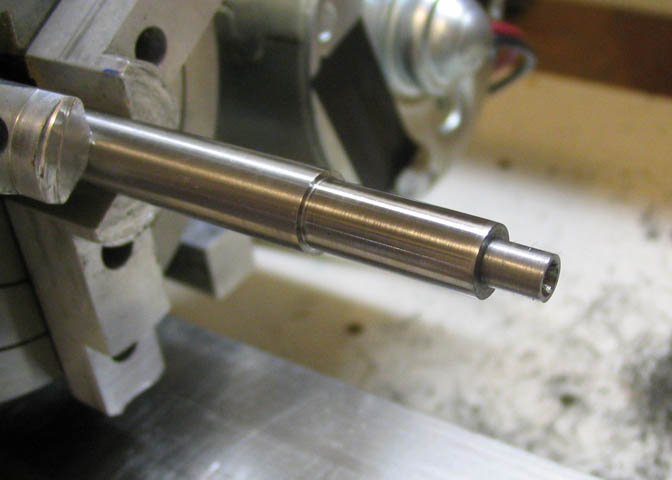
This is the cutter blank, ready to go. The diameter just behind the pilot is sized so it is slightly
bigger than the head on a #10 SCHS. Those heads are about .305" dia. The diameter that
will have the cutters on it is .310". Whatever size counter bore you are making, two things
have to be kept in mind; The pilot must be slightly smaller than the through hole for the screw,
and the cutter must be slightly larger than the head of the screw.
The largest diameter shown in this picture is the stock drill rod 3/8" size. It's a perfect match
for a collet to be used in the mill, so it's left as-is for the tool shaft.
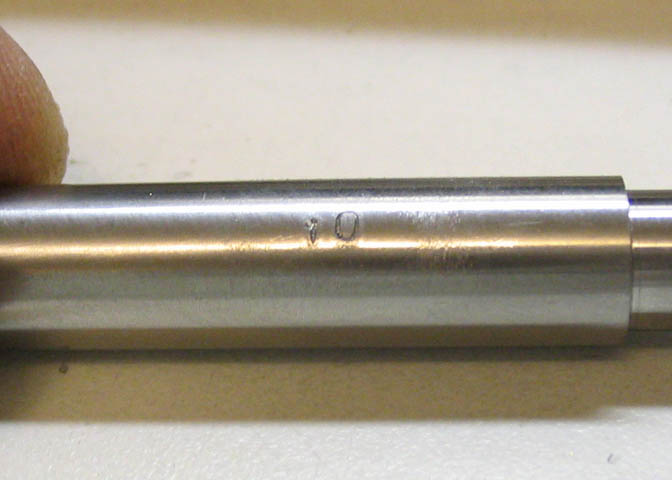
When the blank is finished, it's marked with it's size. In this case, #10. This must be done
before the tool is hardened. Put it near the cutter end of the shaft so it doesn't interfere
with the milling machine collet or what ever other tool holder is used with this cutter.
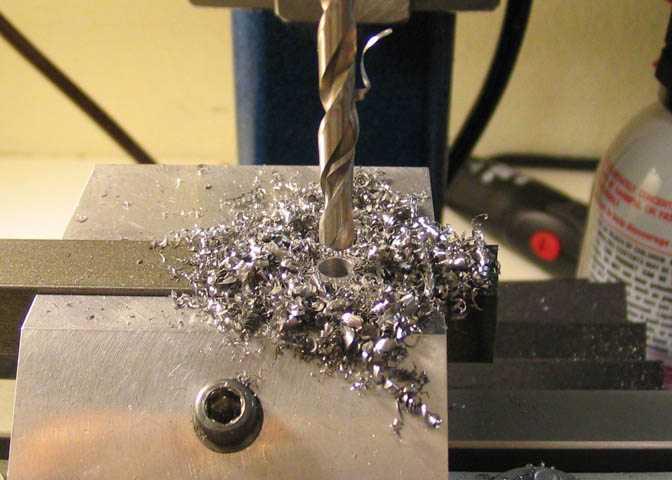
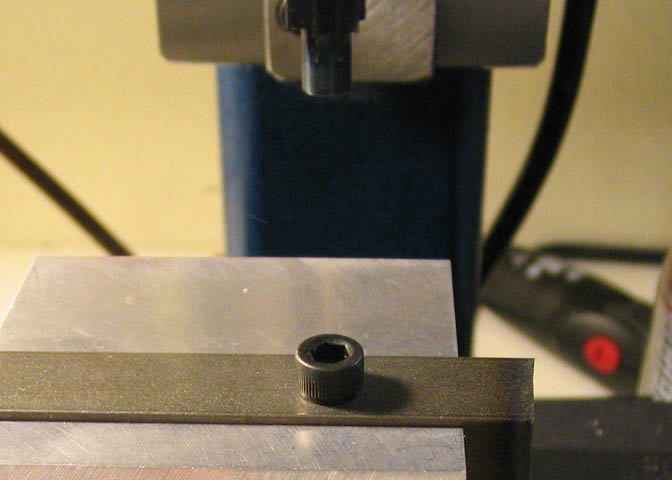
This counter bore will have six flutes, so a piece of hex shaft is prepared to use for indexing
while cutting them. This piece happens to be brass, but it comes in steel too. A piece about two
inches long is used here. The ends are faced off, one end is center drilled and it is drilled through
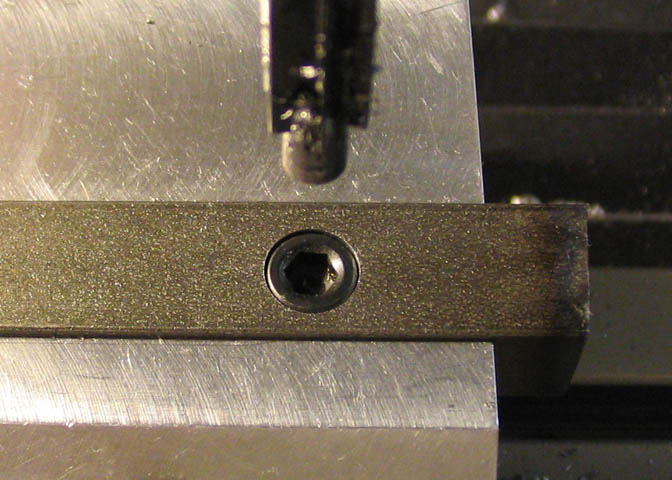
for a hole to be finish reamed with a 3/8" reamer. A couple of threaded holes are then cut
for set screws to hold the counter bore blank. The shot above shows one of the threaded holes,
and a piece of folded up index card in the bottom of the hole. The card keeps the set screws
from scarring the tool blank, which would make it hard to remove from the hex when done.
If you are making a four flute cutter, a piece of common cold rolled square stock will work
the same way. If you want to make a three flute cutter, just use the hex holder and cut using
every other flat. Take care to get your center hole dead center, whether you are making
six or four sided holders.
When the holder is made up, run a file over the flats to make sure there are no burs that will
keep it from sitting flat against the vise jaws.
Now the blank is put in the indexing block and the set screws tightened. Leave no more sticking
out of the block than necessary. Put the block in the vise with two of the flats facing the jaws
and use a straight edge to make sure the block is flush to the sides of the jaws. It's very important
that this last bit is done every time that the block is repositioned to cut another flute. Make sure
the block sits well against the bottom of the vise too. If it doesn't, the flutes on the cutter will not
all come out to the same depth.
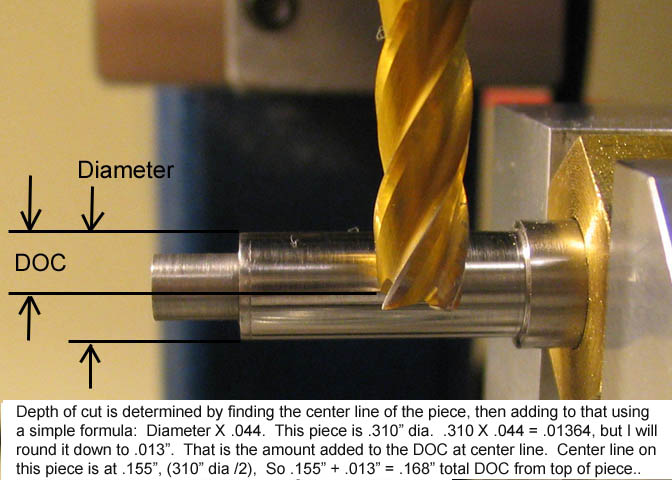
The above picture pretty much tells what is needed here, but I'll go over it to be sure.
The total depth of cut from the top of the part that will be the flutes is found by multiplying
the diameter of that section by a factor of .044, and adding the product to one half the diameter
of the piece. That factor of .044 works for cutters over about .300" in diameter. For smaller
diameters, it changes. I've added info for some of those lesser diameters a few paragraphs down.
The diameter of this part is .310".
Half the diameter is .155".
The factor used is .044.
Diameter X .044 + 1/2diameter = total depth of cut from top of piece.
For this piece;
.310" X .044 = .013 (rounded down),
1/2 of the diameter is .155". Add .155" to .013" to get the total DOC of .168".
Find the top of the piece, then crank
the table in toward the column of the mill to clear the cutter. Then use the formula to find your
depth of cut. The example in the picture is for a cutter to make counter bores for #10 screws,
but the same can be used for larger sizes. Use the diameter of the blank you are cutting and multiply
it by .044. Then crank the mill spindle down that amount, plus half the diameter of the piece
The same formula works for other straight flute cutters too, such as reamers and T-slot cutters.
I don't know who came up with it. It, and similar formulas can be found as references in certain
books and articles pertaining to machining practices.
Note that the flutes will be cut on the side nearest the operator. It has to be this way, unless
you want to run your mill in reverse when using this tool!
For making cutters under .300" diameter, the factor used has to be changed, or eventually you
will start decreasing the diameter of the section through the flutes, and your cutter will be too
small. I haven't found anything regarding sizes under .300", but while making smaller counter
bores I noted the factors that worked for them. These apply to six flute cutters.
For a cutter .270" diameter, the factor is .026.
For a cutter .230" diameter, the factor is .015.
For a cutter .185" diameter the factor is .015.
For a cutter .141" diameter, the factor is .010.
These four diameters coincide with counter bore sizes for #8, #6, #4, and #2, respectively.
For cutters under .141" diameter, I would start by cutting the flutes on the centerline of the
cutter. I've never made a counter bore for a screw smaller than a #2 socket head cap screw,
but I know that when you start getting that small, the material that backs up the cutting
edge of the flute gets pretty thin. The solution is to make fewer flutes. Even on a #4, a
cutter with six flutes has a thin section from the cutting edge to the trailing edge of the flute.
It's easier to make four flute cutters for any of the above sizes, actually. The example of
six flutes is used in this article simply because that's what I was making when I wrote it.
When you have your depth of cut set, crank the table over so the end mill comes nearly
to the larger diameter of the shaft, and set your mill stop. Crank it back the other way so
end mill is about half way into the pilot, and set the stop for that direction too. This is
pretty important so you don't cut grooves along the entire length of the pilot while trying
to count the turns of the hand wheels.
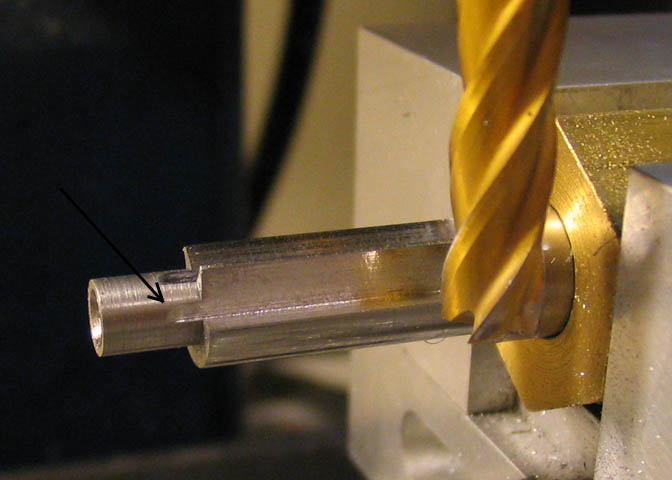
Begin cutting on the left end of the blank. The black arrowhead shows the approximate position
of the start of the cut. The flute needs to go into the pilot just a bit to make sure the cutter will
have a cutting edge all the way down to the pilot. If it doesn't, it won't want to cut the center
most part of the counter bore. Leave the majority of the pilot un-cut though, so it is smooth, and
will be a good guide for the end of the flutes.
Just as a guide when cutting the flutes, the part that has cut into the pilot is about .015" feed on
the Y axis, after the main part of the flute has been cut. Since the end of the new tool is kind of
hanging out in the breeze, unsupported, the cuts need to be light to prevent chatter. On this
particular counter bore the diameter of the part that will have flutes is only .310", so the first
three cuts on the Y axis were .010", and after that were reduced to .005" until the cut was finished.
If a smaller cutter is being made, the cuts have to be reduced further.
Once the first flute has been cut, the reading of the Y axis dial is noted, and all the rest of the
flutes are cut to that in-feed.
Just for the curious, the end mill in this shot is TiN coated solid carbide, 1/4" dia.,
Atrax brand. It was turned at just over 2000 rpm for these cuts, and each cut, (not
each complete flute), took about five seconds. The flutes are just over 3/4" long.
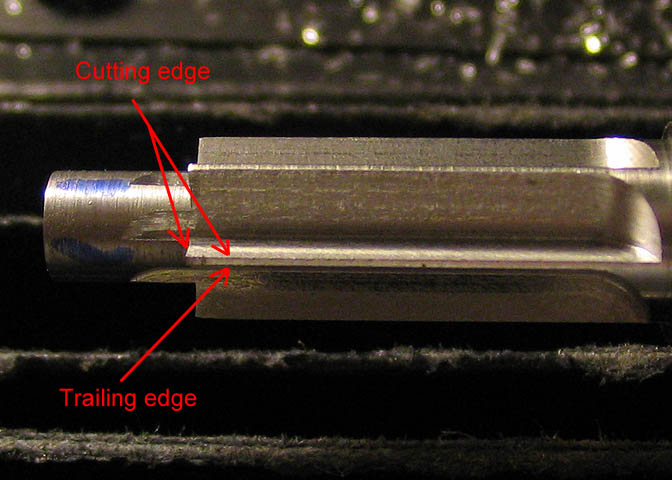
The shot above shows what is what, just in case someone is wondering. The side of the flute
marked "Trailing edge" doesn't do anything. Just follows the other guys 'round and 'round.
That edge needs to be relieved a little bit. Just a few strokes with a small file will do it. Push
the file long-ways along the trailing edge just to take the back half of that edge off, but do not
touch the file to the parts marked cutting edge. The long cutting edge that lies adjacent to the
trailing edge doesn't actually do any cutting, but don't run the file over it. It supports the tip
of the edge that does the real work at the left most red arrowhead. That needs to be good and
sharp, and if you take a file to one cutting edge, you will mess up the other. Just do the trailing
edge.
All that needs to be done to the cutting edges is to run a flat, smooth, hard Arkansas stone on
them. Keep the stone flat against the larger area that forms the flute, and don't let it roll over
on the cutting edges. Just keep it flat and everything will be wonderful.
Now the very tips of the cutting edges need to be relieved. Slew the vise over to the right
about 5 degrees. I say "about" because that is close enough. The cutting tips won't know
if you set them at 5 degrees, or 4 1/2, or 5 1/2. Get the vise in the ball park and it will be fine.
In other words, don't sweat over 1/2 a degree that you can't even see on your protractor anyway.
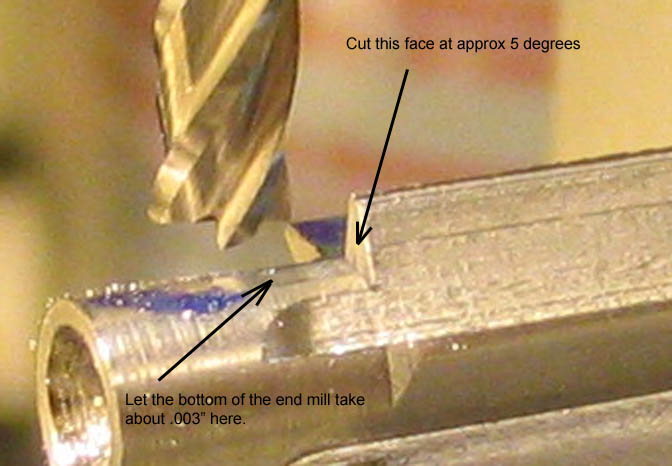
Unplug your milling machine before making the following adjustments.
For this step, the cutting edge of the counter bore needs to be oriented properly to the cutting
edge of the end mill. Easy to do. There is an arrow that says "Cut this face at approx. 5 degrees".
The back side of that flute needs to be vertical, i.e., in the same plane as the end mill. To get
it there, loosen the set screws in the indexing block. It's okay to take it out of the vise if needed.
If you took it out, put it back in the vise leaving the set screws loose, so you can turn the counter
bore in it. Jockey your mill tables around until you can get the end mill setting near the unseen side
of the flute that has the arrowhead on it, and turn the counter bore while adjusting the mill table
to get the back side of that flute vertical. When you have it right, the end mill will fit with its end
against the back side of one flute and flush against the cutting side of the other. Move the table
away from the end mill and tighten the set screws.
Now you can plug in your machine and get to cutting.
In the shot above a 1/8" end mill is being used. Again, while making these cuts, you don't
want to cut the entire length of the pilot. Bring the end mill down until it touches the pilot,
and then crank it back up so there is .001 clearance between it and the pilot. Now, with the
mill running, run the Y in and out as you crank over the X, until the end mill takes a light cut
off the end of the flute. Crank the spindle down .004" and take one more cut. The idea here
is to make a cut across the entire face of the end of the flute. Index the holding block to the
next flat and continue until all the cutting edges are done. These are the edges that do the
actual cutting on a counter bore. Take care to get the index block back in the vise with its
end flush with the sides of the jaws on the vise while doing this. This step provides the relief
that the cutting edges need. It can also be done with a very fine file or a small stone. If it's
done that way, then just file or stone off the surface directly behind the cutting edge. The
idea is to keep all the cutting edges at the same depth, so they all get a chance to do some work.
When this is done, the cutter is completely formed. All that is left before hardening it is to
use a hard Arkansas stone on any burs you see. Be careful that you do not round over any
cutting edges. Keep the stone flat against any surface you are working on.
Hardening drill rod is fairly straight forward, but from what I hear and read it seems that
many people equate it to one of the dark arts. The stuff is made for this purpose! I'll do
my best to make a simple explanation.
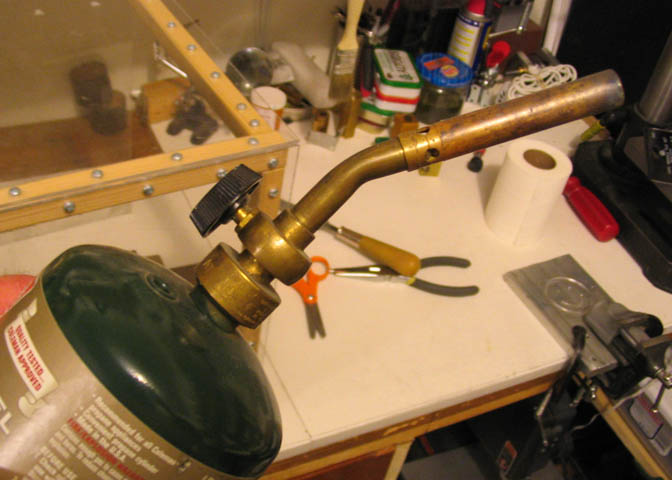
You can use a common Bernzomatic type torch, as shown above. For short sections of
drill rod up to about 3/8" diameter, this is all that's needed. For the counter bore, since
a good portion of its mass has been cut away at the cutting end, and the cutting end is all
that needs to be hard, one of these torches will do, but I often use two of them to get on with
the job.
You will need your torch(es),
a lighter,
a small can of motor oil, (like a soup can full),
something to hold your counter bore, (like pliers, but a hemostat works great),
a small magnet on a some kind of rod,
gloves are good,
paper towels, in case you make a mess.
For the oil, I use 30 wt, but I expect that most regular motor oils will work fine.
If you use water hardening drill rod for this, substitute a can of water for the oil.
Here's how it's done;
Light your torch(es) and set them on a bench. Hold the counter bore, or what ever you're
heating, in the hemostat, pliers, or whatever. Put the piece into the flame and turn it slowly
as it heats up. Only the cutting flutes and pilot need to be heated to the final temperature.
Any of the length of the shaft that gets hot is incidental, and you don't need to worry
about it. It's going to get hot no matter what, but there's no reason to attempt to get it as hot
as the business end of the tool.
Keep the tool in the flame, moving it and rotating it so the flutes and pilot are evenly heated
as best you are able. Pretty soon it will go through a bunch of different color changes. The
color you are looking for is a distinct bright orange, more or less the color of an orange, carrot
or pumpkin. If you are doing this in bright daylight, it may be hard to tell when you reach this
color. Doing it in the shade, or open light of a shop will help, but no worries, since there is a
test to help you know when it's good.
When you think it is about the right color, take the
magnet-on-a-stick thing and try it against the piece while it is still in the flame. If you are "there"
the magnet won't show any attraction for the cutter. None. It will act like you were touching it to a
wooden stick. If you've reached this stage where the magnet won't stick, it's at the right temp.
Hold it there for as long as you care to, but a couple of minutes at least, or until you get bored.
Then, plunge it straight down into your can of oil. At this point, you're going to think, "Why
did I do this in the house?" It's going to make a stink when you put it in the oil, you know, so
do this out of doors or in a well ventilated shop. Leave it in the oil, swirling it around, until you
can touch it with your fingers without getting burned.
Look, don't get burned. Just leave it
in the oil for five minutes.
Now this piece is as hard as it can get. Even too hard, if you want it to last for long. It's
so hard that it will probably shatter before you get good use from it, so it needs to be tempered.
Tempering is the same process as hardening, the difference being the temperature of the piece
when you dunk it in the oil. So, you follow the same procedure as for hardening, above, but
you don't heat the piece to bright orange.
Here's how to temper it;
First thing, after the piece is taken out of the oil from hardening it, it will be black and sooty
looking. To temper, you need to be able to see the surface of the steel, because you have to
be able to watch it change colors as you heat it again. Clean off the cutter with some naphtha
or other grease cutting fluid. Then, a part of the cutting end needs to be polished so the steel
is nice and bright. It's easy to polish the pilot. Put it in a drill press or lathe and use 1200 grit
sand paper. (Be sure to cover your lathe bed if you use the lathe. You don't want sandpaper
grit on it.) Don't let the sand paper rub on the cutting edges of the cutter.
You also need to be able to see the color of the flutes. At least two of them straight across
the diameter of the tool from each other. Use a sanding stick and polish the back side of one
flute and the front side of the opposite from it. When polishing the back side of the one, you don't
really have to worry about hitting the cutting edge, since it's the trailing edge. When polishing
the front side of the other flute, be careful not to roll over the cutting edge. That's why you
need a sanding stick. One can be made with a popsicle stick. Paste a narrow strip of sandpaper
to one side of it, and when you polish, take care not to roll over the cutting edge. Keep it flat!
The polished surfaces should be bright and shiny when you get done. Now it can be tempered.
Use the same setup as for hardening, but this time the magnet is not used. Only one torch is
needed. Light it and turn it to a low flame. Play the cutter in and out of the flame and keep a
sharp eye on it. Rotate it 'round and 'round as you move it in the flame and watch the polished parts.
As soon as it starts to show what is called "straw" color, plunge it into the oil.
"Straw" is a kind of yellow, and can be related to the color of straw, but it would have been easier
to figure it out if it was just called something like golden yellow.
This part has to be watched pretty closely to get the right color and dunk it before it gets too hot.
Tempering takes the brittleness out of the cutter while still leaving it hard enough to cut other steels.
Certain colors of the steel are used for tempering for different uses. The yellow or straw color
just described is useful for making tools from drill rod that will be used to cut other metals.
Different colors are used for things like chisels, which are tempered for impact rather than sharpness.
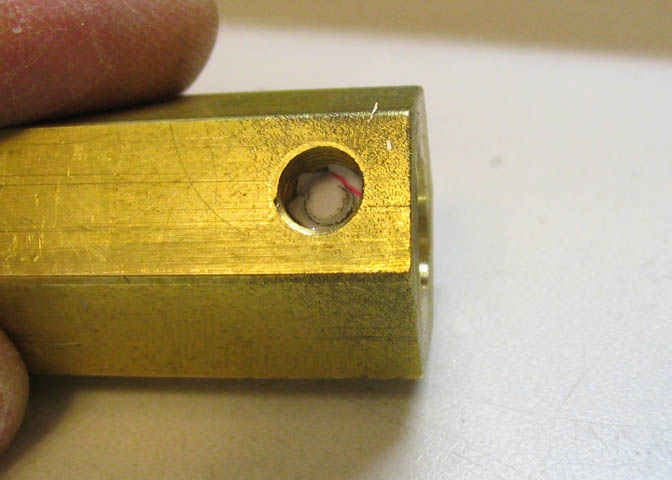
Finally, it's time to test the new counter bore. A through hole for a #10 screw was drilled
through a piece of square CRS.
A #10 socket head cap screw is put through the hole to check that it's the right size.

Then it's time to cut. Hardened drill steel is hard, but it's not high speed steel. The lowest
speed on my mill, about 500 rpm, was selected and let 'er rip. A few drops of Tap Magic
cutting fluid as it cut and the chips came rolling out. That's what it's supposed to do.
A perfect fit for this size of cap screw.
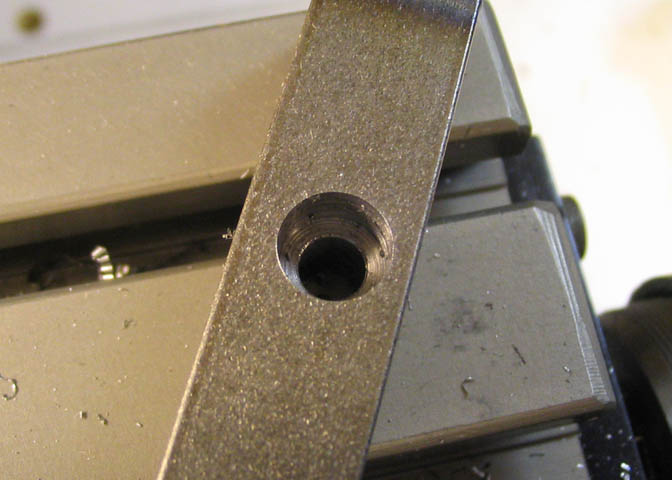
And a nice little counter bored hole.
That's it, finished. Run it slow and use cutting fluid and it will last quite a while.
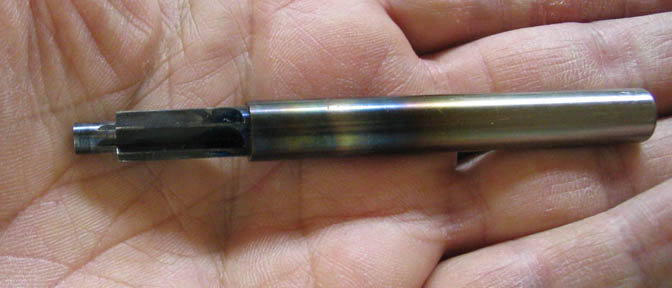
There's a note of interest here for some. Two of the colors used when drawing temper
are well seen in the above picture. Right about the point of the joint between my fingers
and the palm of my hand is the color referred to as "straw". Slightly to the left of that
point, where the straw turns to almost brown, then blue, is what you often see called for in
color/temperature charts. The straw color from tempering the flutes can't really be seen
on them since they turned black again on the second trip into the oil.
I made up a set of these in sizes 2, 4, 6, 8, and the 10, all with six flutes.
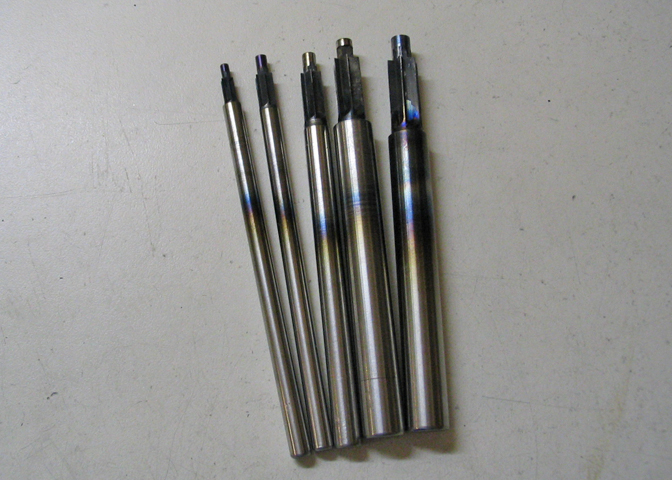
The pilot on the #2 at the far left is only .088", so it's pretty small.
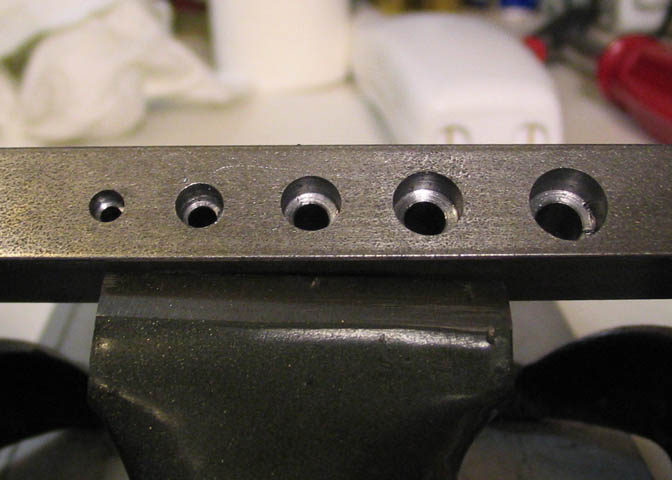
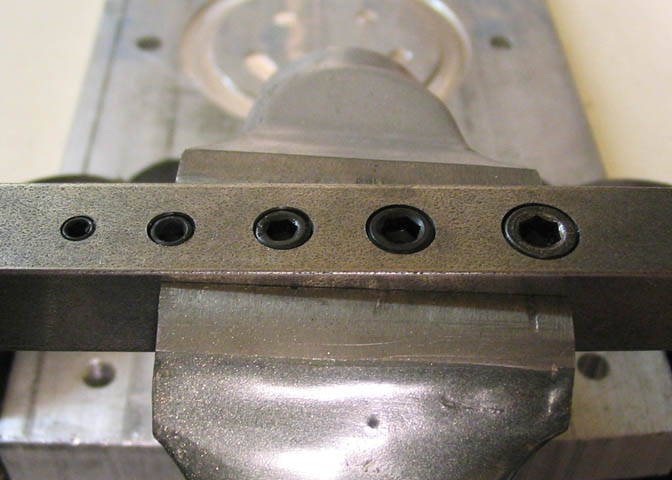
Numbers 2, 4, 6, 8, and ten, again.
More Taig Lathe & Mill Projects
deansphotographica.com
(home page)
Copyright Dean Williams